Construction Punch Lists: How to Build, Track and Close Every Item
By Kush Agarwal, President and CEO, YelloSKYE. Published .
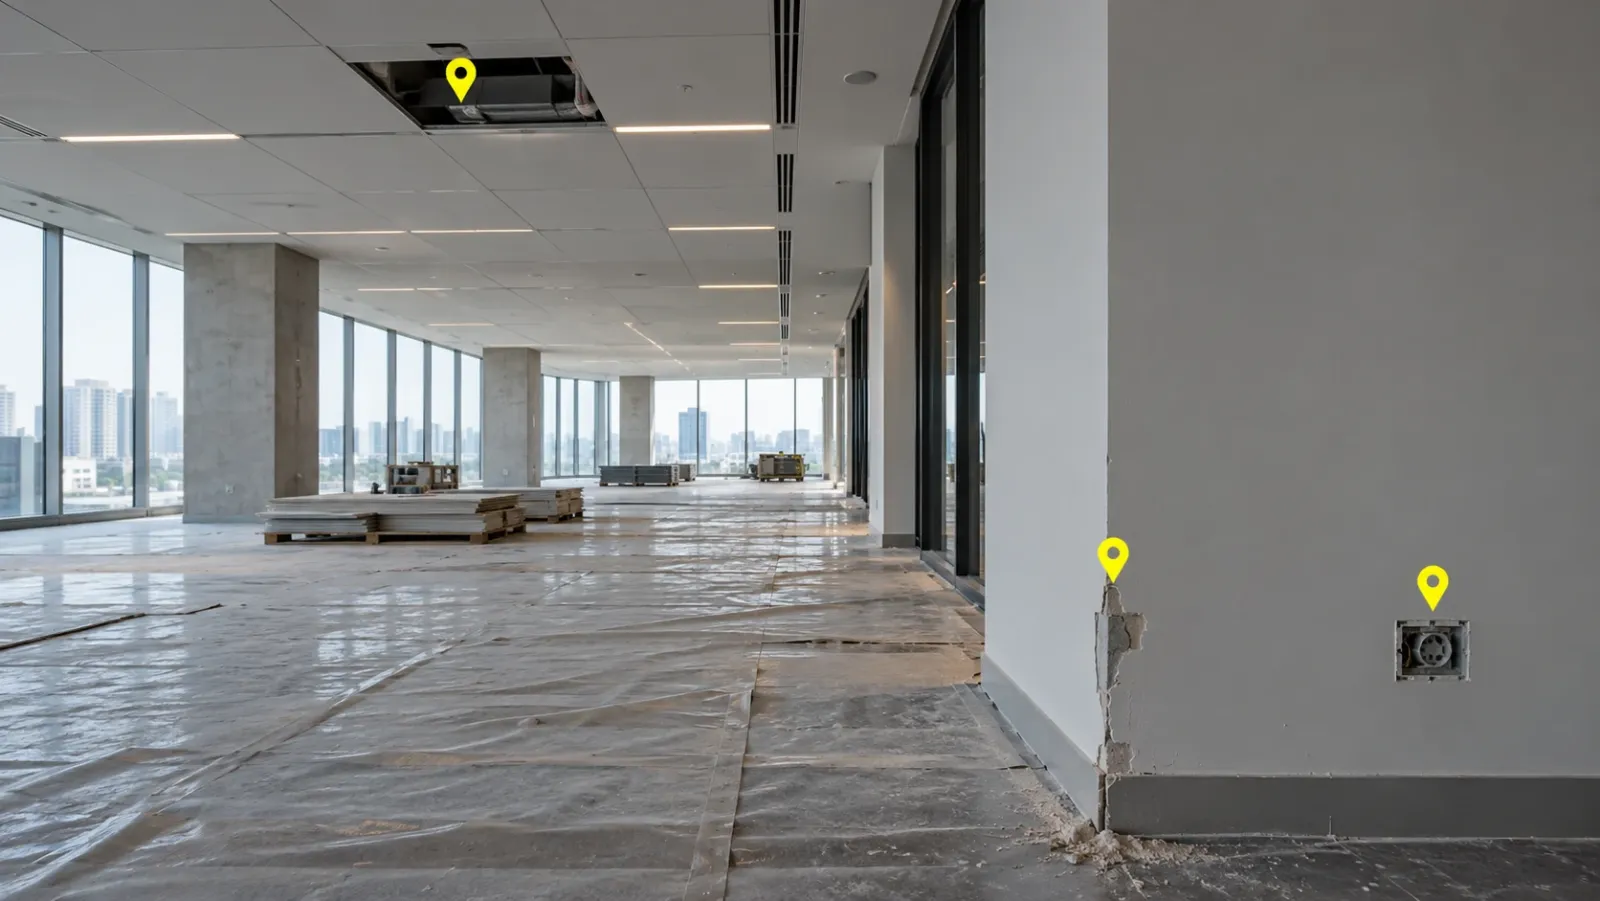
Executive Summary
- The Question: How should a project team build, track and close a construction punch list so that handover is not held up by a long tail of open items?
- The Answer: Treat every item as a located record: a position on the plan, a photo, an owner, a priority and a due date. Find defects as work finishes rather than at the end, and only close an item when a second person has seen photographic proof of the fix.
- The YelloSKYE Angle: Construct IQ captures interiors in 360° and lets teams tag issues directly on the site visual, so each punch item carries its location, its evidence and its history from the moment it is raised.
A construction punch list is the record of everything that is unfinished, installed incorrectly or damaged when a building, or a section of it, is close to completion. Every item on it has to be corrected and confirmed before the owner accepts the work and the contractor's final payment and retention are released. In the UK, the Middle East and many other regions the same document is called a snag list.
The list itself is simple. Managing it is not. A large project can generate hundreds of items across dozens of trades, each needing to be found, fixed, checked and signed off. This guide covers where the punch list sits in project closeout, how to write items that get fixed first time, how to track them to verified closure, and how located visual evidence from Construct IQ, our construction monitoring solution, shortens the whole process.
Where the punch list sits in project closeout
Contracts use different words for the stages, but the sequence is broadly the same everywhere. The punch list connects the moment a building is usable to the moment the contractor is fully paid.
| Stage | What happens | Role of the punch list |
|---|---|---|
| Contractor's own inspection | The contractor checks each area before inviting the owner's team | Produces the first, internal list; most items should be fixed here |
| Practical or substantial completion inspection | Architect, engineer or owner's representative inspects the work | Formal list agreed, with priorities and dates |
| Completion certified | The owner can occupy or use the building; outstanding minor items are recorded | Remaining items are attached to the certificate |
| Rectification | Trades return to fix outstanding items | Items move through assigned, fixed and verified |
| Final completion | All items verified and closed | Final payment and release of retention can proceed |
| Defects liability period | Defects that appear in use are reported and repaired | A new list is kept for latent defects |
The commercial effect is direct. Until the list is closed, money is held back and the contractor's team cannot be released to other projects. For the owner, open items delay fit-out by tenants or the start of operations.
What a good punch item looks like
Most of the delay in closing punch items comes from items that were poorly written. "Fix wall, level 2" sends a decorator around a floor looking for a mark that someone else saw. A good item can be found, fixed and checked by someone who was not on the walk when it was raised.
| Field | Why it matters | Example |
|---|---|---|
| Location | The trade must find it without a guided tour | Level 2, room 2.14, east wall, 1.2 m from the door |
| Photo | Shows what is wrong and how big the problem is | Wide view of the wall plus a close-up of the damage |
| Description | States the defect and what "fixed" means | Plaster chipped at corner; make good and repaint to match |
| Responsible trade | One owner per item | Drylining contractor |
| Priority | Sets the order of work | Before completion |
| Due date | Makes progress measurable | Seven days from issue |
| Status and history | Shows where the item is and who touched it | Raised, assigned, fixed, verified, closed |
| Closing evidence | Proves the fix rather than reporting it | Photo from the same position after repair, with the verifier's name |
One defect, one item, one owner
Combining "chipped corner and missing socket cover" into a single item means two trades share it and neither feels responsible. Split it. If a defect needs work by more than one trade, raise linked items and sequence them.
Write for the person fixing it
Describe the defect and the expected result, not the cause or who was to blame. Arguments about responsibility for damage belong in a separate conversation backed by the site record, not in the item text.
Building the list
Find defects while the trades are still on site
The most expensive punch item is one found after the trade has left. Getting a crew back for a handful of small fixes costs more in travel and disruption than the fixes themselves, and it competes with their next project. Inspect each trade's work as it finishes, and record defects immediately. A list built up throughout construction is shorter at the end than one written in a single final walk.
Inspect before the owner's team does
The contractor should walk every area first and fix what it finds. The owner's inspection then confirms quality rather than discovering it, and the formal list starts short. It also builds confidence: a team that turns up with a clean area and a short list is trusted more on the items that remain.
Walk by zone, on a fixed route
Divide the building into zones that match how the work will be handed over, such as floors, apartments, plant rooms and external areas. Walk each zone in the same order every time, so nothing is skipped and repeat inspections can be compared with the previous visit.
Agree what each priority means before the walk
Disagreements about priority slow the list down at the worst possible moment. Agree definitions at the start of closeout.
| Priority | Typical items | Must close |
|---|---|---|
| Critical | Life safety, fire stopping, failed tests, anything that blocks occupancy | Before completion is certified |
| Functional | Equipment not working as specified, missing fittings, leaks | Before the owner takes over the area |
| Finish | Paint touch-ups, minor marks, cleaning, adjustments | By an agreed date after completion |
| Documentation | Missing manuals, warranties, test certificates, as-built drawings | Before final completion |
Documentation items are easy to forget because nobody can see them on a walk. Put them on the same list so they are tracked with the same discipline as physical work.
Tracking items through to closure
A punch list is only as good as its status information. Use a short, fixed set of statuses and make sure every change is recorded with a date and a name.
- Raised. The item is recorded with location, photo and description.
- Assigned. A trade has accepted it, with a due date.
- Fixed. The trade says the work is done and adds a photo from the same position.
- Verified. Someone other than the trade checks the fix, on site or from the closing evidence.
- Closed. The item drops off the open list. If the fix is rejected, the item returns to assigned with a note.
Require evidence before closure
A trade marking an item as done is a claim, not a result. Ask for a closing photo from the same viewpoint as the original, so the before and after can be compared side by side. Where a physical check is still needed, the photo tells the inspector exactly where to look.
Report by trade and by zone
A single list of four hundred items helps nobody. Filter it by trade for the weekly coordination meeting, so each contractor sees only its own items, and by zone for the handover programme, so the team can see which areas are ready. Track the number of open items over time: if the line is not falling, more people are raising items than closing them.
How located visual evidence changes closeout
Paper lists and spreadsheets record what someone wrote about a defect. A visual record shows the defect itself, where it is and how it changed over time. That difference speeds up every stage of closeout.
Items raised in context
On Construct IQ, a site team member walks the interiors with a 360° camera and the images are mapped to their location on the plan. Issues are then tagged directly on the site visual, so the contractor sees exactly where and what needs fixing. In our interior fit-out use case, flagging, observing and tracking issues visually in this way led to snag-to-closure cycles five times faster.
Remote verification
Because each capture is a navigable record of the space, a project manager or consultant can review fixes and measure installations remotely, and save physical inspections for items that genuinely need one. That matters on large buildings where a single verification walk can take a day.
Settling who caused damage
Damage to finished work is one of the most common sources of friction at closeout. When the site has been captured on a regular rhythm, the team can step back through earlier dates to see when the damage first appeared and which trades were working in that area at the time. Our guide to construction photo documentation explains how to set up a capture rhythm that makes this possible.
Checking against the design
Some punch items are not damage but deviations from the drawings, such as a misplaced opening or a service run in the wrong position. Comparing captures with the BIM model catches these during construction, when they are cheaper to correct. Our as-built versus BIM clash detection use case shows how this works on a live structure.
From closed list to complete handover
Closing the last punch item does not finish the job. The owner, and often the facility operator, also needs a reliable record of what was built. Manuals, warranties and as-built drawings remain essential, and a dated visual record now sits alongside them, showing services before they were enclosed and the condition of every space at completion.
In our warehouse operator handover use case, drones and 360° cameras logged progress across every zone throughout construction, and the incoming operator received role-based access to the full visual history at completion. The result was zero post-handover documentation disputes. For more on keeping records that hold up when questions arise later, see our guide to construction dispute documentation.
Why punch lists drag on
- Items found too late. Defects recorded only at the final walk mean remobilising trades for small fixes.
- Vague descriptions. Items that cannot be found, or whose required result is unclear, come back as rejected.
- No single owner. Shared items wait for someone else to act.
- Closure on someone's word. Items closed without evidence reopen at the owner's inspection.
- Several versions of the list. When the contractor, the consultant and each trade keep their own copy, nobody knows the true status.
- Paperwork left to the end. Missing manuals and certificates hold up final completion after every physical item is closed.
Closeout checklist
- Agree priority definitions, statuses and who can verify a fix before closeout begins.
- Divide the building into handover zones and set a fixed inspection route for each.
- Inspect each trade's work as it finishes, and record defects while the trade is on site.
- Carry out the contractor's own inspection of every zone before inviting the owner's team.
- Record every item with location, photo, description, one responsible trade, priority and due date.
- Require a closing photo from the same viewpoint, verified by someone other than the trade.
- Review open items weekly by trade and by zone, and track the total over time.
- Keep documentation items on the same list as physical work.
- Hand over the closed list together with the visual record of the building, not instead of it.
Frequently asked questions
What is a punch list in construction?
A punch list is the list of work that is incomplete, incorrect or damaged when a project, or a part of it, is nearly finished. Each item must be corrected and checked before the owner accepts the work as complete. In many countries the same document is called a snag list or a defects list.
Who creates the construction punch list?
The main contractor usually prepares the first list from its own inspection, then the architect, engineer or owner's representative inspects and adds their items. Specialist contractors fix the items in their scope, and the owner's side confirms each fix before the item is closed. The exact roles depend on the contract.
What should each punch list item include?
A precise location, a photo, a short description of what is wrong and what correct looks like, the responsible trade, a priority and a due date. When the item is fixed it also needs a closing photo taken from the same position, plus the name of the person who verified it.
What is the difference between a punch list and a snag list?
There is no practical difference. Punch list is the common term in North America, while snag list is used in the UK, Ireland, the Middle East, Australia and elsewhere. Both describe the items that must be put right before handover.
How can you shorten a punch list at the end of a project?
Record and fix defects throughout construction instead of saving them for the final inspection, and carry out your own inspection of each area before the owner's team sees it. Inspect each trade's work when it finishes, while the trade is still on site. The fewer items left for the end, the shorter the list and the faster the handover.