Wind Turbine Drone Inspection: Finding Blade Damage and Planning Repairs
By Kush Agarwal, President and CEO, YelloSKYE. Published .
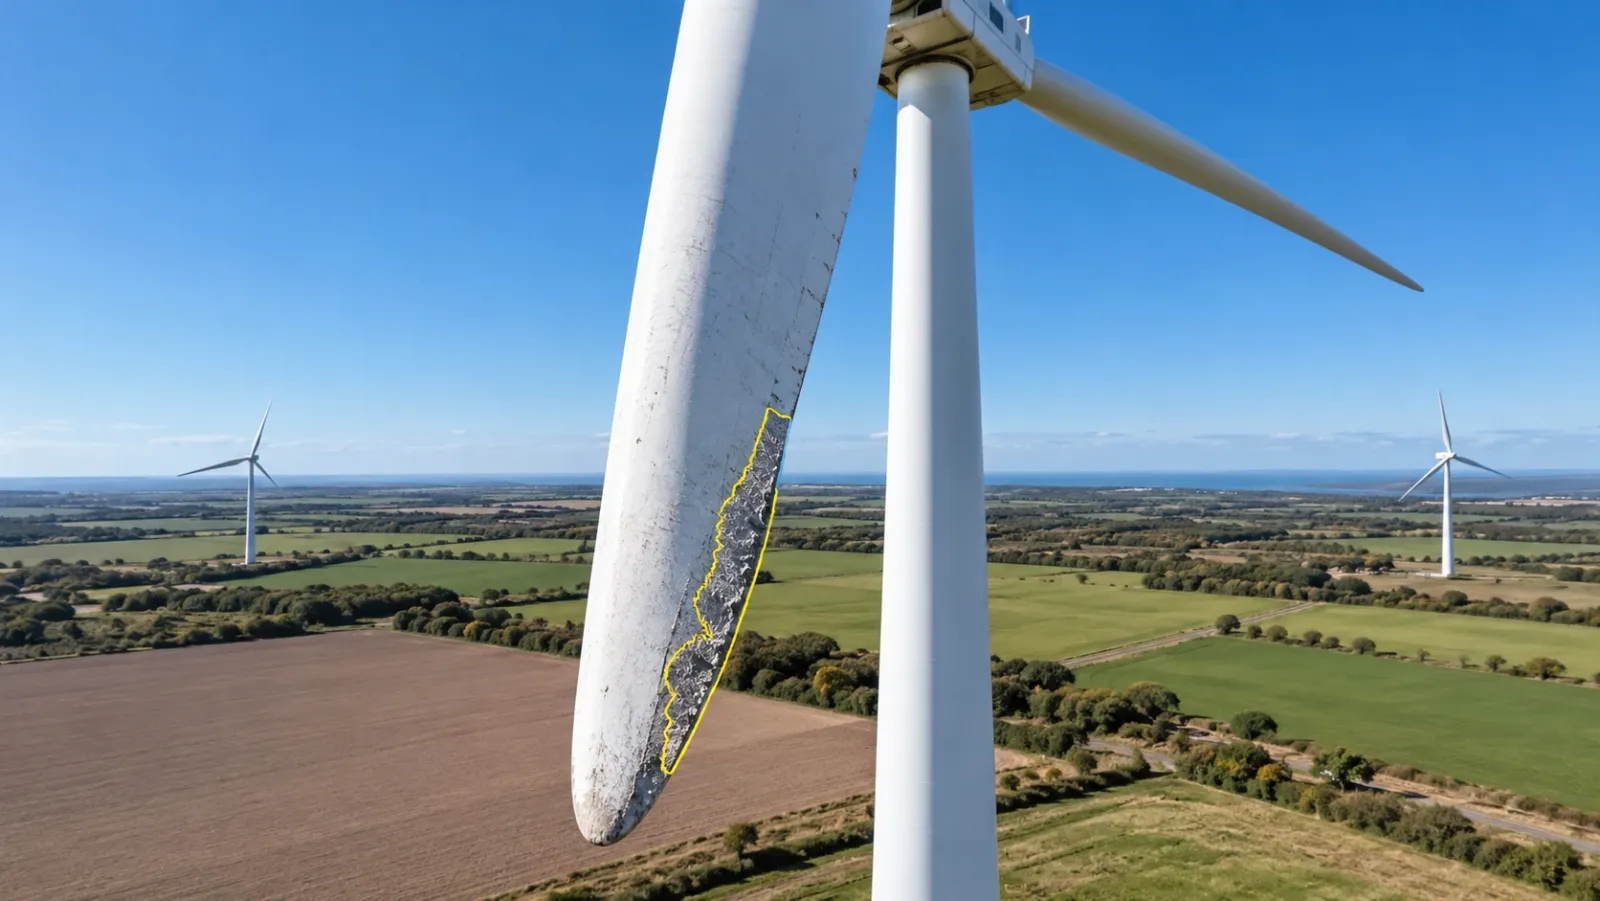
Executive Summary
- The Question: How are wind turbine blades inspected by drone, what damage does it find, and how do the findings become a repair programme?
- The Answer: With the rotor stopped, a drone flies along every side of each blade and records erosion, lightning damage, cracks and coating faults with their exact position on the span. The record lets owners grade damage, watch it grow between inspections and send rope or platform teams only to the blades that need work.
- The YelloSKYE Angle: Inspect IQ runs high-resolution sweeps of turbine blades to detect lightning strikes, leading-edge erosion and fine fractures, and keeps every located finding in the DEX platform for comparison and repair planning.
A wind turbine drone inspection is a close visual survey of a turbine's blades, and often its tower and nacelle, carried out by a drone flying a set path around the stopped rotor. It records surface damage such as leading-edge erosion, lightning strikes and cracking along the full length of every blade, and ties each finding to the blade and its distance from the root. The turbine is back generating soon after the drone lands.
For owners, asset managers and maintenance contractors, the drone answers the first question in any blade programme: which blades are damaged, where, and how badly. YelloSKYE's Inspect IQ carries out rapid high-resolution blade sweeps for exactly that purpose. This guide covers the defects that matter, how an inspection is flown, how onshore and offshore work differ, and how a set of findings becomes a repair plan.
Why blades get most of the attention
A modern blade is a long composite shell, usually glass or carbon fibre in resin, built in two halves and bonded together along its leading and trailing edges. It spins through rain, hail, dust and insects at high tip speed for years at a time, and it is the tallest point in the landscape when a storm passes over. Blades are also expensive to replace and slow to source, so finding damage while it is still small and repairable is where most of the value lies.
Blade damage also tends to progress. A rough patch of coating lets water and grit work into the laminate; a small crack grows with every load cycle. Regular inspection is how owners catch damage at the stage where a repair team can fix it in a few hours on a rope, instead of later when a blade has to come down.
Defects a drone inspection finds
The table lists the common external findings, how they look in close imagery and why they matter.
| Defect | How it appears in the images | Why it matters | Typical response |
|---|---|---|---|
| Leading-edge erosion | Roughened, pitted or gouged coating along the front edge, worst towards the tip; exposed laminate in later stages | Reduces aerodynamic performance and, left alone, opens the laminate to moisture | Filler and coating repair, new leading-edge protection |
| Lightning damage | Scorch marks around receptors, burnt or missing receptors, cracks or blown-out shell near the tip | Can indicate a fault in the lightning protection path and hidden structural damage | Priority inspection, receptor and laminate repair, continuity test |
| Trailing-edge splits | An opening or crack along the rear bond line | Adhesive joint failing under load; can grow quickly | Close inspection, structural repair |
| Shell cracks | Lines running across or along the blade surface, sometimes near the root or the widest part of the blade | Possible structural cracking under the coating | Engineer assessment, monitoring or repair |
| Coating and gelcoat damage | Chips, crazing, peeling paint, impact marks | Lets moisture reach the laminate | Cosmetic or protective repair |
| Add-on damage | Lifting protection tape or shells, missing vortex generators or serrations | Loss of performance; loose parts can detach | Refit or remove |
| Contamination | Insect build-up, dirt, oil streaks from the hub | Reduces performance; oil can point to a leak in the hub | Cleaning, mechanical check |
On the asset inspection page, Inspect IQ's blade diagnostics are described as detecting lightning strikes, leading-edge erosion and micro-fractures. YelloSKYE's AI models flag likely defects across the image set and categorise each one, which shortens the search through the large number of frames a single turbine produces. A blade engineer then reviews and grades what has been flagged.
The same flight usually covers the rest of the exterior as well: oil running down the tower, coating breakdown and corrosion, damage to the nacelle cover, and on offshore units the transition piece and access platform.
How a blade inspection is flown
Preparing the turbine
The operator stops the turbine, locks the rotor and yaws the nacelle to suit the wind and the light. The rotor is usually parked with one blade pointing straight down, which gives the drone a clean line along that blade and a predictable layout for the other two. Blades may be pitched so that the face being photographed is turned towards the camera.
The flight path
Each blade has four faces to cover: the pressure side, the suction side, the leading edge and the trailing edge. The drone flies along the span at a fixed distance, root to tip and back, capturing overlapping images so nothing is missed. Many inspection systems now follow the blade automatically, using onboard sensors to hold a steady stand-off along its length, which gives consistent images from one inspection to the next. YelloSKYE flies pre-programmed paths wherever the asset allows for the same reason: repeat flights produce comparable views.
Tagging every image
An image of a white composite surface means nothing unless you know where it was taken. Each frame is tagged to the turbine, the blade (often by its position on the hub or its serial number), the face and the distance from the root. That reference is what lets a rope team arrive at the right spot.
Conditions
Turbines are built where it is windy, so the inspection window is set by the drone's wind limits as well as the operator's wish to stop the turbine when generation is low. Bright sun gives sharp detail but can cause glare on glossy coatings, so pilots adjust angles to keep reflections off the surface they are recording. Rain, low cloud and ice all stop the work.
Thermal capture
Thermal imaging can sometimes reveal damage beneath the surface, such as delamination or a failing bond line, because those areas heat or cool differently as the sun moves across the blade. Results depend heavily on conditions and on the blade construction, so thermal blade findings are treated as leads that need confirming. Our guide to drone thermal inspection explains when thermal data can be trusted.
Onshore and offshore inspections
The inspection method is the same at sea; almost everything around it changes.
| Factor | Onshore | Offshore |
|---|---|---|
| Getting there | Vehicle to the turbine pad | Crew transfer vessel or a service operation vessel |
| Launch point | Ground beside the tower | Vessel deck or the turbine's access platform |
| Weather window | Wind and rain limits | Wind, sea state, visibility and vessel transfer limits all at once |
| Erosion and corrosion | Varies with local rain, dust and hail | Salt spray and frequent rain add to erosion; corrosion on steelwork is a constant concern |
| Cost of hands-on access | Rope teams or truck-mounted platforms | Vessel time, specialist crews and longer weather waits |
| Turbines per day | Limited mainly by driving between pads | Limited by vessel movements and transfers |
Because hands-on access is so much harder offshore, a thorough drone record carries more weight there. A repair campaign planned from good images can group work by location and severity, so a vessel and its rope teams spend their limited weather windows on the blades that most need them.
From findings to a repair plan
An inspection is only as useful as the decisions it supports. The steps below turn a set of images into a programme of work.
Grade every finding
Most owners grade blade damage on a numbered scale. The definitions belong to the owner, manufacturer or insurer, but they usually look something like this:
| Grade | Typical meaning | Usual action |
|---|---|---|
| 1 | Cosmetic, no effect on function | Record and monitor |
| 2 | Minor surface damage | Repair at a convenient time |
| 3 | Damage that will grow if left | Plan repair in the next campaign |
| 4 | Significant damage affecting structure or performance | Repair soon, consider operating limits |
| 5 | Severe or structural | Stop the turbine and act now |
Locate and measure
Each finding needs its turbine, blade, face, distance from the root and approximate size. That is what a repair contractor prices and plans against.
Track change between inspections
The same erosion patch seen on two dates tells you how fast it is growing, which is the best guide to when it needs fixing. In the DEX platform, YelloSKYE places each finding on the captured asset, lets reviewers slide between capture dates to see when damage first appeared, and provides dashboards of open issues, severity and resolution across a whole portfolio.
Group the work
Repairs are planned by site, by weather season and by access method. Grouping several grade 3 repairs on the same turbines into one rope-access visit is usually cheaper than chasing each one separately. YelloSKYE exports findings as a defect database, with marked-up images, GPS position, severity rating and a recommended remedy for each entry, in PDF, Excel or BIM-linked formats, which makes it easier to hand a scoped package to a repair contractor.
Close the loop
Mark a repair as complete only when a later image, from the repair team or the next drone flight, shows the fixed condition. A blade history built this way also supports warranty claims, insurance discussions and end-of-warranty inspections.
The pattern is the one YelloSKYE describes in its solar farm thermal inspection work: every defect mapped to its exact position so maintenance crews know exactly where to go, instead of searching on the ground. On a wind farm, the search happens at height, which makes a precise location even more valuable.
What a drone blade inspection cannot tell you
- It sees the outside only. Damage to the spar, shear webs or internal bond lines appears in images only once it reaches the surface. Internal inspections use crawlers or cameras inside the blade.
- It cannot test the lightning protection system. Burn marks show a strike; whether the down conductor still works needs an electrical continuity test by a technician.
- It cannot measure depth. An image shows how wide erosion is, not how far into the laminate it goes. A repair technician confirms that by hand.
- It needs the turbine stopped. Inspection time is lost generation, so plan for low-wind periods.
- It depends on image quality. Dirt, insect build-up and glare can hide or imitate damage, and a poor image set is worse than a short delay for better conditions.
None of these limits is a reason to skip the drone. They are reasons to treat the drone record as the first stage, with targeted hands-on work following it. The same order of work applies on buildings, as the facade inspection from a desk use case describes, and on bridges, covered in our guide to drone bridge inspection.
Blade inspection checklist
- Decide the purpose: routine condition check, post-lightning check, end-of-warranty review or pre-purchase due diligence.
- Agree the grading scale with the owner, manufacturer or insurer before the first flight.
- Confirm the blade identification scheme so every image can be tagged correctly.
- Arrange stop, rotor lock and yaw position with the turbine operator, and pick a low-wind window.
- Obtain flight approval from your national aviation authority (such as the FAA for American sites, or the CAA and GCAA for British and Emirati ones) plus any site or marine permissions.
- Cover all four faces of every blade, plus tower and nacelle if in scope.
- Grade, locate and measure each finding, and compare with the previous inspection.
- Group repairs by site, severity and access method, and book rope or platform teams only where needed.
- Record each repair and keep the same flight plan for the next cycle.
Frequently asked questions
How does a drone inspect a wind turbine blade?
The turbine is stopped and the rotor locked, then the drone flies along each blade from root to tip and back, photographing every side at a fixed distance. Each image is tagged to the blade and its position along the span, so a defect can be found again by a repair team. Many operators now use automated flight paths that follow the blade's shape.
What damage can a drone find on wind turbine blades?
A high-resolution camera picks up leading-edge erosion, lightning burns and split tips, cracks in the shell and along the trailing edge, coating and gelcoat damage, and loose or missing add-ons such as protection tapes and vortex generators. It records the surface only, so damage inside the laminate or the bond lines is found only when it shows on the outside.
How long does a turbine have to stop for a drone blade inspection?
Only for the flight itself, which is short compared with setting up rope access or a platform. Exact times depend on the turbine size, the drone, the wind and whether the flight is automated. Operators usually schedule inspections in lower-wind periods to limit lost generation.
How often should wind turbine blades be inspected?
Most owners inspect blades on a regular cycle set by their maintenance strategy, insurer or manufacturer, often yearly, with extra checks after a lightning strike or before a warranty ends. Sites with harsh conditions, such as offshore farms or areas with heavy rain, hail or sand, often need shorter intervals.
Can a drone replace rope access for blade inspection?
Not entirely. A drone covers the visual survey of every face of every blade without anyone climbing. Rope access or platform teams are still needed for repairs, lightning protection tests and close checks of findings a camera cannot resolve, so the drone record decides where those teams go.